OBS Setup for Church Live Streaming OBS LiveStream nonprofit volunteer church live streaming
During the pandemic of 2020, my church was live streaming the worship service. This post documents how we set up our OBS system to accommodate our situation. We wanted non-technical volunteers from the parish to be able to run the live stream without having to learn OBS. In addition we wanted to be able to playback videos, audio, and display overlay graphics. We also had two cameras so we needed the ability for the media team volunteer to change camera views while keeping a consistent graphics and keep any audio playback constant.
Overview
It’s important to document the needs of our church service because it won’t work for all situations.
- Two cameras: Support for two or more cameras. If you have a single camera, this setup is too complex.
- Easy to use: We wanted to make sure media team volunteers did not have to use OBS directly. They could run the live stream only using a Stream Deck and push buttons.
- Lower Third Graphic Overlays: We wanted support for lower 3rd graphics (e.g. Speaker names, Bible Readings, Music / Hymn credits) and the ability to have them controlled independently from the cameras. The way OBS is designed, it is difficult to have lower third graphics controlled independently from camera scenes. The setup documented here allows independent control via the Stream Deck.
The End Result
This video shows a bit about how the volunteer would use only the Stream Deck to control the live stream. No OBS controlling necessary beyond viewing the multiview!
The hardware
- Gaming PC: I’ve found that you need a relatively powerful graphics card to run OBS without dropping frames
- Stream Deck XL: This is a fanstatic device that allows multiple actions to be mapped to a simple button push.
- Three Monitors: Two for the media console and one set up in front of the pews (facing the rector) so she/he can see what’s being broadcast. Later, we can use the 3rd monitor to also broadcast in the parish hall.
- PreSonus AudioBox USB 96: Audio link from the house sound system
- PTZOptics 30X-SDI Gen 2 Live Streaming Broadcast Camera: Two of these cameras
- Blackmagic Design DeckLink Duo 2: For connecting the cameras via SDI to the PC. Note there are some compatibility issues that limit the framerate to 30 fps from the incoming cameras.
OBS Setup
Scenes
We had a few types of scenes: ‘Core’ scenes that just had pure media sources and a ‘Combo’ scenes that is an aggregation of other scenes. These two types were used for any live shots of the sanctuary. We had other ‘Fullscreen’ scenes like Pre-Show slides or Recorded videos that were just treated like normal OBS scenes since they took over the entire screen and audio.
Core Scenes
- Lower Thirds: Contains all the lower third graphics. Usually in PNG format with 70% opacity so some of the background shows through.
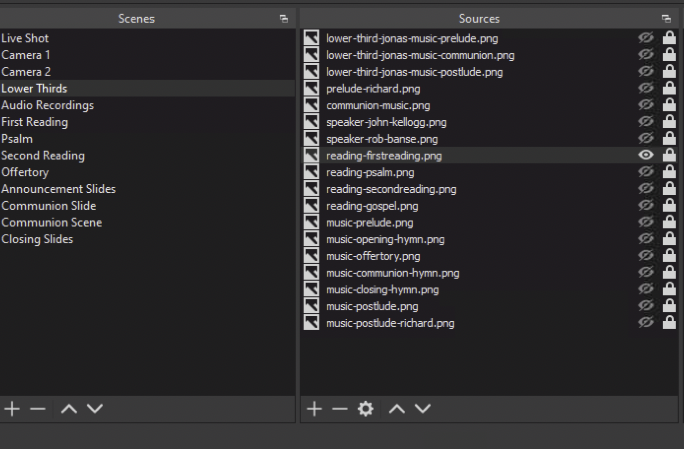
- Audio Recordings: Contains all the pre-recorded audio if you have any. For a while, our organist would record the audio and send it to be played during the service.
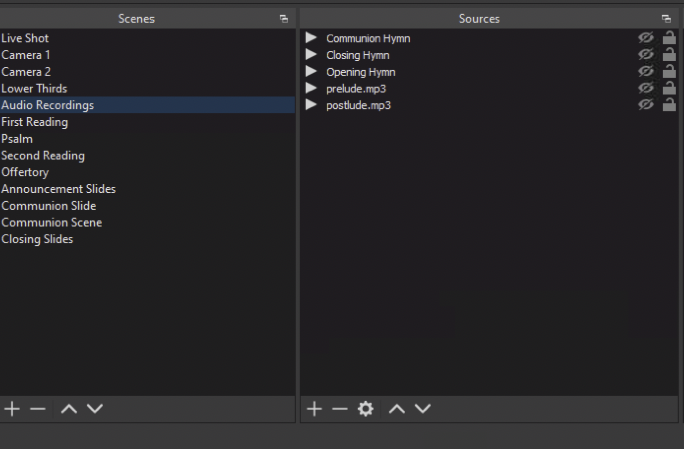
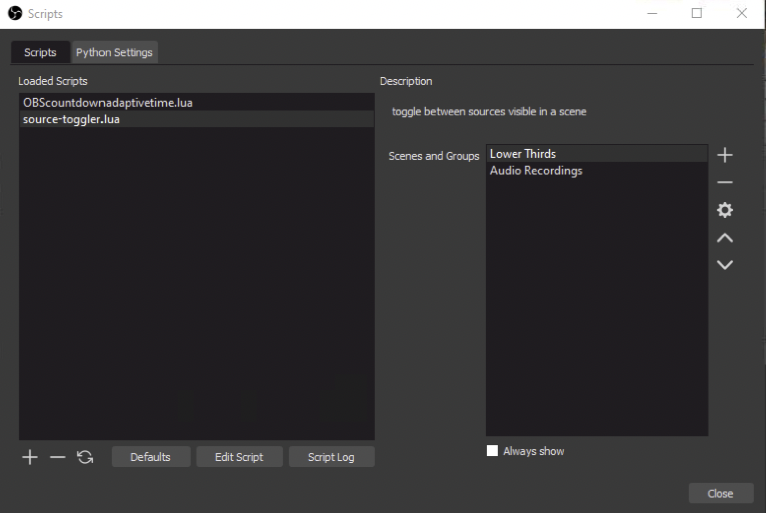
For both these scenes, you’ll want to download and install the Source Toggler script.
Combo Scene
- Live Shot: Combines the core scenes above plus:
- The PreSonus Audio Source
- PTZ Camera 1
- PTZ Camera 2
It should look something like:

Note that we have two additional scenes for each camera: Camera 1 and Camera 2 (each mapped to the corresponding media source). We just use those for the MultiView
Stream Deck Setup
The stream deck is where the magic happens. This allows a volunteer to easily control the live stream feed by just pressing buttons. They don’t have to manipulate anything in OBS at all - this significantly decreases the learning curve.
While the exact layout changes week-to-week based on the worship service, here’s a typical layout that has all the elements:
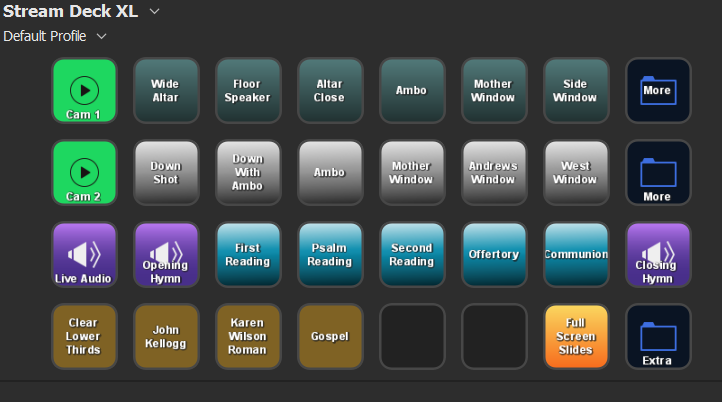
So let’s talk about each of the button types:
- Green Cam 1 & 2: Activates the specified camera to be the live shot
- Dark Grey/Light Grey: Instructs the PTZ camera to recall a preset shot. Top row is for Camera 1 and bottom row is for Camera 2
- More: Goes to additional page with more buttons (usually more of the same like camera presets)
- Purple Speaker: Indicates what audio to use for the live shot. So Live Audio broadcasts the house sound system via the PreSonus. Other buttons like Opening Hymn turns off the PreSonus feed and instead plays the recorded audio, but still keeps the live video from the sanctuary.
- Blue Buttons: Plays back a pre-recorded video. No live shot, just switches to a different scene.
- Brown Buttons: Activates a lower third graphic overlay. But does not change which camera is live or what audio is live.
- Full Screen Slides: Plays the pre-show slide show scene
So you can see that a volunteer can pretty much change the camera shot independent of either the audio being played and the lower third graphic.
Button setup
We’ll explain each type of button here. One small bit of configuration in OBS you’ll have to do is map Ctrl-T hotkey to the Transition action.
Green Camera Buttons (Type Multi-Action)
Configure the following actions:
- OBS Studio: Source -> Activate -> Scene: Live Shot -> Camera 1
- OBS Studio: Source -> Deactivate -> Scene: Live Shot -> Camera 2
- OBS Studio: Scene -> Live Shot -> Preview
- System Hotkey -> Ctrl-T
And for Camera 2 button, just reverse which camera is active
Camera Presets (Type Website)
The PTZOptics cameras have presets that you can access via a simple URL. So replace the IP address of your camera in the actions below:
- System Website ->
http://192.168.1.105/cgi-bin/ptzctrl.cgi?ptzcmd&poscall&XXX-> Check Get request in background
Where XXX is a numeric digit like 1 or 8
Live Audio button (Type Multi-Action)
- OBS Studio: Source -> Deactivate -> Scene: Live Shot -> Audio Recordings
- OBS Studio: Source -> Activate -> Scene: Live Shot -> PreSonus
- System Hotkey -> Ctrl-T
Any other recorded audio button (Type Multi-Action)
- OBS Studio: Source -> Deactivate -> Scene: Live Shot -> PreSonus
- OBS Studio: Source -> Activate -> Scene: Audio Recordings -> {Pick the recording}
- OBS Studio: Source -> Activate -> Scene: Live Shot -> Audio Recordings
- System Hotkey -> Ctrl-T
Make sure the source media has Auto Play on Visible enabled in OBS
Clear lower thirds button (Type Multi-Action)
This button is used to clear any lower thirds on the screen
- OBS Studio: Source -> Deactivate -> Scene: Live Shot -> Lower Thirds
- System Hotkey -> Ctrl-T
Any other lower thirds button (Type Multi-Action)
- OBS Studio: Source -> Activate -> Scene: Lower Thirds -> {Pick the lower third graphic}
- OBS Studio: Source -> Activate -> Scene: Live Shot -> Lower Thirds
- System Hotkey -> Ctrl-T
Wrap up
That’s about it. You can see how it kinda works in the Youtube video above. If you have additional questions or comments, you can reach out to me at: eroman@washingtonparish.org